About Us
Members
Albums
Newsletters
Events
Fiero Classifieds
Guest Book
Fiero Sites
|
2001.06 2001.05 |
2001.06
[ printable version ]
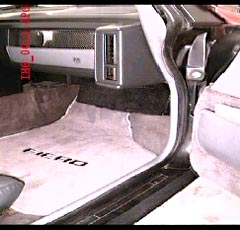
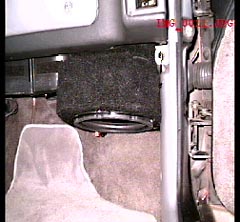
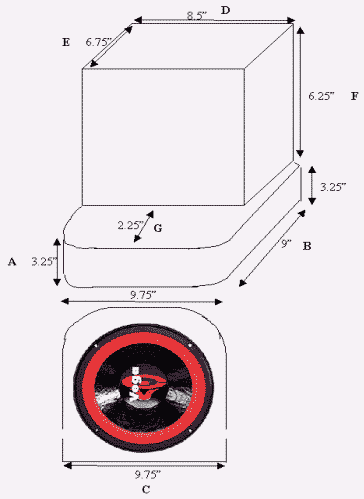
Sub Box Construction for Stock Location in any Fiero These are the steps that I followed to construct my subwoofer box to be used with an 8" sub. After looking and searching for sub boxes for the Fiero for many years no one seemed to fit my needs. I didn't want a box behind the seat because that would compromise sound and seat travel. There are several for the footwell but that one too would take up space. There's another for the center console but in my case (6' tall) I need that space for my elbow. After all the options unsuitable I decided to build my own box for the stock location. The stock location has enough space to build a sealed box with around 0.30 cubic foot volume. That's enough volume for some efficient 8"subwoofers in the market designed for small enclosures. In my case I used a Rockford Fostgate Punch XLC sub which requires 0.30cf volume. There are others like Kicker Solobaric ($$) and Polk Audio. It all depend on the amp you use (sensitivity) and $$. The box was constructed with fiberglass material. Hope you find this useful. * See diagram to reference dimensions. 1. First I made the mold out of green floral foam. I hot glued several blocks & cut the basic top square shape (dim E,D,F) then test fitted several times leaving clearance for glass thickness (about 1/4" per side). 2. Then added bottom part (dim A,B,C) and test fitted again. Round corners can be cut to taste. 3. Put the bottom part of the mold over a 3/4" MDF and mark down the shape and cut. Then mark the sub shape and cut that hole (make sure is the right diameter). Glue this plate to the foam mold. Remember that dimension "A" is the plate plus the foam together. 4. Taped the mold (foam part) with masking tape to avoid the glass to stick to it. 5. Now the messy part. Over that I put 4 layers of fiberglass (about 3/16" to 1/4" thick). Would have added 2 more but I was lazy and wanted to finish it. As a minimum do 4 layers. More if you want. Remember to let each layer dry before adding the next layer. 6. After all is dry took out the foam in chunks. Easy to do with a knife or preferred tool. 7. I was also able to take out the masking tape out of the walls too (not important) for cosmetic. 8. I added some small wood bracing to the walls on the top portion for added rigidity. I used beams of 1/2" x 1/2" in a cross from wall to wall and then added a small piece from the bottom to the cross. I cut the pieces to fit very snugly and then put a screw from the outside to hold it in place. 9. I added a small connector for the speaker wire on the MDF plate. I drilled two small holes to pass the wires and screwed in the connector. Make sure that area is well sealed. You don't want an air leak there. 10. Put some poly foam. 11. I installed carpet material over it to finish the look. Here you can use your imagination. 12. Install subwoofer into box. 13. After construction and carpeting my sub Fitted very snugly into place. It is being held by couple of black tie-raps. No movement at all. You may do differently here too. 14. Hook to amp and enjoy!
Author: Alex Torres (88Formula 3.4L)
Palm Beach Fieros Club
|